
Implementing cloud VPN solution using AWS, Linux and WireGuard
What is a VPN, and why is it important?
A Virtual Private Network, or VPN in short, is a tunnel which handles all the internet data sent and received between Point A (typically an end-user) and Point B (application, server, or another end-user).
This is done with security and privacy in mind, because it effectively masks all the traffic against would-be listeners (Internet Service Providers, man-in-the-middle, and many more).
VPN as your bastion
Having a functional VPN means being able to establish a zero-trust policy against external actors. In other words, all your confidential services, such as the intranet, source code repository, development environments and internal applications can be locked to be accessible only via the VPN.
Needless to say, having a secure VPN is required for successfully passing the audit of highly recognizable security standards such as ISO/IEC 27001/27002 or SOC 2 (if you are interested in cybersecurity in tech companies check our blueprint).
Leverage your AWS cloud infrastructure
With this article, you will be able to leverage your AWS cloud infrastructure to deploy and implement your own VPN server, which you can then customize to your needs.
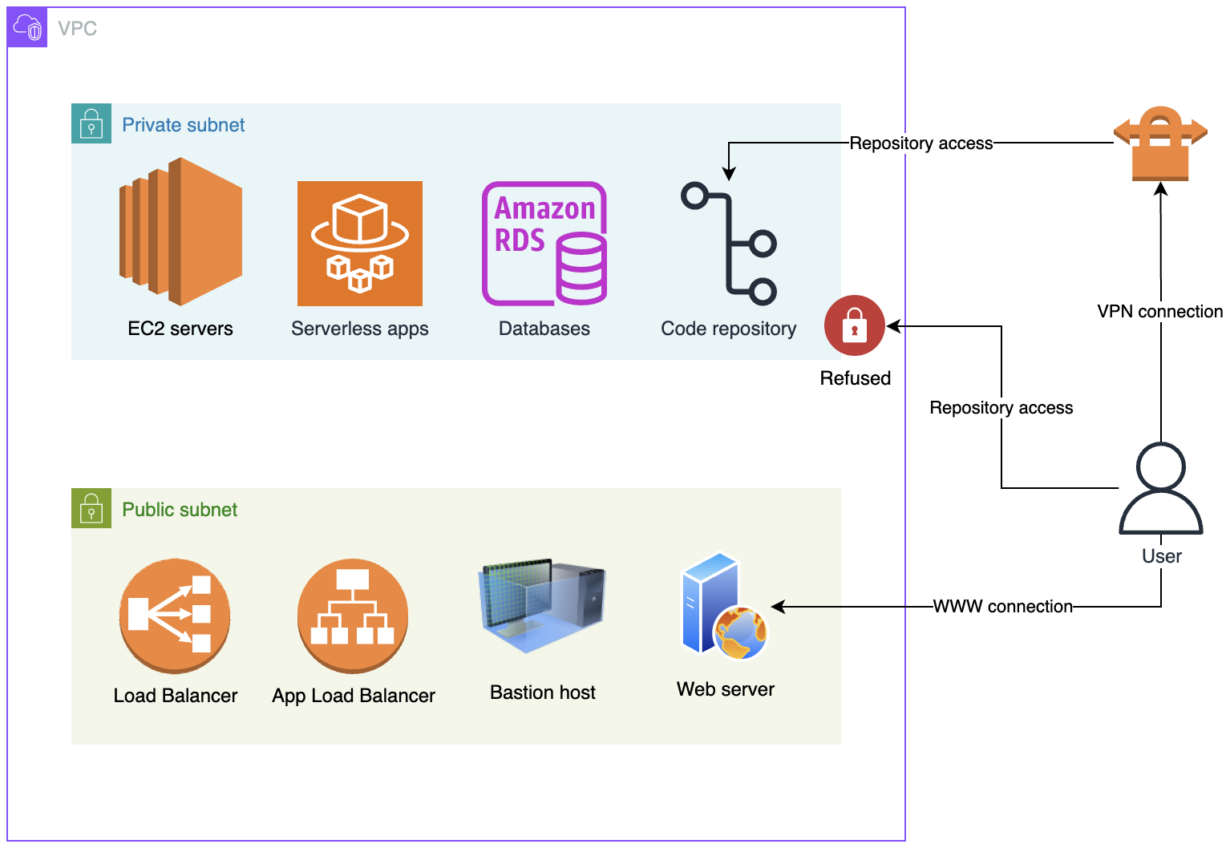
Overview of AWS infrastructure with enhanced security of confidential assets due to VPN.
As you can see in the solution overview diagram, anybody can access your public resources (such as your company website). This is working as intended by design.
Your infrastructure relies on a bastion host (a jump server) to access your private resources. Back in the day, this option was acceptable; however, in the modern day of increased risk and heightened security, there are better solutions than this. Your bastion host is only as secure as any other publicly accessible resource and could easily be cracked into by a determined, experienced hacker. Even worse, there can be scenarios where the infrastructure and its security have never been a priority due to various factors, and thus, it’s all been exposed to the public with easy access for just about any interested hacker.
On the other hand, a VPN has none of these flaws and is contained within a private network. Only the personnel using your VPN service are authorized to access your confidential resources, such as the code repositories that hold your proprietary source code or databases containing valuable data. Implementing a VPN will save you, your employees, and your company from many headaches, as data leaks will be much less likely to happen thanks to this configuration.
Let’s dive into a competent, open-source VPN standard: WireGuard.
WireGuard – Introduction to the protocol
WireGuard is a simple and fast VPN solution that utilizes state-of-the-art cryptography. With all of that in mind, it still manages to outperform both IPsec and OpenVPN. WireGuard is cross-platform, thus it works on Linux, Windows, macOS, BSD, iOS and Android.
Essentially, it works by exchanging SSH keys between an end-user and the VPN server to establish a passwordless, secure connection.
As for the security details, WireGuard primarily relies on: Noise protocol framework, Curve25519 (ECDH), ChaCha20 (symmetric encryption), Poly1305 (authentication of symmetric encryption), BLAKE2 (hashing and keyed hashing), SipHash24 (hashtable keys), HKDF (key derivation) and secure trusted connections.
All of these standards have been thoroughly tested by cybersecurity experts which further guarantees your peace of mind.
Technical considerations
Besides having an IT professional on-board to implement the solution, there are certain tech requirements that need to be met:
- Cloud-hosted or self-hosted server with at least 0.5 GB of available memory to dedicate to the VPN service.
- Internet connection enabled for the server.
- Static public IP address.
Implementation overview
As you have read, introducing a VPN solution like WireGuard carries many advantages. Let’s focus on implementing it within the Amazon Web Services (AWS) cloud. This section assumes that you are experienced in using Linux and are familiar with AWS.
Be aware that I will provide a general technical implementation plan in this section. You will still need to fine-tune the results to match your specific configuration. When in doubt, consult with the System Administrator responsible for managing your organization’s infrastructure.
If you prefer managed services instead of deploying your own infrastructure, you can skip ahead to the Third-party tools section referencing Tailscale.
Step 1 – Initial setup
In this step, we are going to set up a virtual machine (EC2) with a static, public IP address, a firewall (Security Group) and a way to permanently store configuration files needed for WireGuard to function.
In order to run a proper VPN on AWS, you will need to allocate an Elastic IP for your server so that it does not change the address every reboot. This is important for consistency in establishing trust-related policies, such as allowlisting the VPN into your internal applications.
Once that’s done, we need to secure our inbound and outbound traffic while allowing our end-users to communicate with the server. To do that, create a Security Group (AWS equivalent of a firewall) which allows inbound and outbound UDP traffic from port 51820 (default WireGuard port, change if you opt for a different one in the configuration from Step 3). This is necessary for our end-users to be able to establish communication with the VPN server.
WireGuard configuration
Next, you will need persistent storage for containing WireGuard’s configuration data. As a quick and easy solution, I recommend creating an Elastic Block Storage volume, a 1 GB gp3 disk should be more than enough even for large-scale operations. Any type of data storage will be sufficient, so long as it’s encrypted and secure, because this will be the place where you are going to store the server’s keypair, as well as the wg0.conf file.
You could even opt for Secrets Manager and have the server fetch and decode the required values on boot. This is the preferred method when going for a higher level of security in the long run.
Finally, set up your server as per your individual requirements. For simplicity’s sake, let’s pick an Ubuntu-based micro EC2 instance with t4g type, because ARM is more efficient and WireGuard can run out-of-the-box on either AMD64 or ARM64 (AArch64). Ubuntu server comes with many AWS tools already included, so it’ll make the entire process much smoother – if you prefer to go for minimalism, choose Debian instead.
Remember to associate the static IP address (via EIP) with your server, as well as the Security Group and the data storage solution of your choice. You can handle this via the built-in Launch Templates function while leveraging Auto Scaling Groups.
Step 2 – WireGuard installation
Before proceeding with the actual installation, you will need to configure the server’s network capabilities.
First, head off to /etc/systemd/resolved.conf and set your DNS, for example primary to 1.1.1.1 and fallback to 1.0.0.1 if you’d like to use the actual Cloudflare name servers. Take a look at the below code snippet:
[Resolve]

DNS=1.1.1.1

FallbackDNS=1.0.0.1
Next, go to /etc/sysctl.conf and ensure net.ipv4.ip_forward is uncommented (remove the initial #).
Once both of these have been completed, restart the sysctl service which can be done via sysctl -p command.
With that out of the way, the installation itself is pretty straightforward. On Debian-based (including Ubuntu) systems all it takes is the following command:
sudo apt -y install wireguardStep 3 – WireGuard configuration
Once installed, let’s prepare WireGuard for daily operations. First, you will need to generate a key pair (privatekey and publickey) for the server itself. Do this with the following command:
umask 077; wg genkey | tee privatekey | wg pubkey > publickeyThen, create the /etc/wireguard/wg0.conf file and apply the following configuration template:
## Server Configuration

[Interface]

PrivateKey = ServerPrivateKey # Get the value from the privatekey file generated earlier

Address = 192.168.10.1/24 # Input your preferred private IP pool here to distribute amongst users

PostUp = iptables -A FORWARD -i wg0 -j ACCEPT; iptables -t nat -A POSTROUTING -o ens5 -j MASQUERADE

PostDown = iptables -D FORWARD -i wg0 -j ACCEPT; iptables -t nat -D POSTROUTING -o ens5 -j MASQUERADE

ListenPort = 51820 # Ensure that it matches the Inbound UDP port from Step 1

MTU = 1420
After applying the template, adjust the key values as per the comments. Once that’s done, launch the VPN service with the following command, which must be executed from within the directory containing the wg0.conf file:
wg-quick up wg0

To have it activate on boot, run the following command:

systemctl enable wg-quick@wg0
If you’d like to close the VPN service, the alternative command is very similar:
wg-quick down wg0Step 4 – User configuration
Last, but not least, let’s take care of the end-users. They will need to install a WireGuard-capable VPN client, which is provided by WireGuard itself on their website, however any such client will do as long as they can handle the protocol.
In WireGuard’s official client, the key pair generation is automatically handled when adding a new VPN connection (add empty tunnel). Otherwise, they will need to run the earlier wg genkey command as explained in the previous section. They will need to provide a PublicKey to the System Administrator for the server-side configuration of their user entry.
Important: Inform the end-user to never share their PrivateKey with anybody.
Still on the server-side, place the following code snippet in etc/wireguard/wg0.conf just below the Server Configuration:
## User Configuration

# Peer 1

[Peer]

PublicKey= UserPublicKey # Obtain the value from the end-user

AllowedIPs= 192.168.10.2 # Set a unique private IP for the end-user

PersistentKeepalive=25
This will need to be done each time a new user has to be added to the VPN list of trusted users. Now, on the end-user side, ask them to open their client and replicate the following configuration with values corresponding to your actual configuration:
[Interface]

PrivateKey = UserPrivateKey # This is present by default, watch out to not overwrite it

Address = 192.168.10.2/24 # This is the static private IP specific to the end-user

DNS = 1.1.1.1

MTU = 1384
[Peer]
PublicKey = ServerPublicKey # Ask the Administrator to provide this value
Endpoint = ServerPublicIPAddress:51820
AllowedIPs = 0.0.0.0/0Step 5 – Fine-tuning the security
After everything has been installed and configured, let’s make your internal services accessible to whoever has established a trusted connection on your VPN. Once again, leverage the AWS Security Group functionality. In each one of your existing SGs, add an Inbound rule with your VPN’s static (public) IP address as the source and set the necessary port (eg. 22 for SSH) depending on your use case. This ensures that all the clients connected to your VPN, and thus sharing the VPN server’s static IP address, are able to connect to your internal services.
As an example, you could go into your GitLab’s security group (or instance firewall) and allow inbound traffic from UDP port 51820 sourced from your VPN’s public IP address. At the same time, it would be wise to deny all other traffic types, so that your end-users have to connect via VPN in order to reach the code repository. The same can be done for any other service.
Step 6 – Troubleshooting & misc tips
If your users are experiencing connectivity issues, first ensure the public keys are correctly passed between the end-user and the VPN server. Next, I recommend taking a look at the MTU values, which can differ depending on the end-user’s system. This is especially important if your users’ devices are running on macOS, as they may have hiccups with MTUs different than 1384.
If you have updated the wg0.conf file and would like to replicate the changes on an already running service, fear not! You do not need to restart the service, all that is required is to run the following command:
wg syncconf wg0 <(wg-quick strip wg0)
Once again, be aware that depending on your environment, you might need to securely store your privatekey, publickey and wg0.conf files to avoid having these files being wiped on reboot. This is why I recommend looking into Elastic Block Storage (for AWS) or other solutions such as scripting the entire process.
Further notes on WireGuard
This section is dedicated to briefly describing some of the available solutions to various use cases.
Active Directory (AD) / Lightweight Directory Access Protocol (LDAP)
While WireGuard shines in the area of performance and security, it may be initially lacking with regards to user management. That’s why you could consider integrating a directory protocol. Either of the directory protocols will allow you to easily manage your users, however they will need an intermediary to handle user authentication through the AD/LDAP and translate it into a key-based system used by WireGuard. You can leverage either Keycloak or Authelia for this purpose.
Cross-VPC connectivity
If you are using more than one VPC in your configuration, whether on the same account or on multiple accounts, you will need to make sure that your VPN can establish a connection between all of the VPCs and their elements. You could consider using either peering connections, NAT gateways or Internet gateways to establish a link between VPCs depending on your needs.
Tailscale
This cloud-based VPN solution uses WireGuard under the hood and offers native user management through its web interface and API. It’s a solid option for smaller teams with a cloud-first approach. It also supports SSO out of the box as an added benefit.
Parting words
Now we have WireGuard ready for action, with your organization equipped against threats to come. However, the journey doesn’t end here, as the world of security is subject to many changes.
I’m eager to hear about your thoughts on the article, and your experiences while working with VPNs.

Authors

I'm a tech enthusiast dedicated to driving innovation in IT, which has been my main interest since 2006. My primary specializations are cloud, cybersecurity and infrastructure solutions.