Using AWS Cognito to authenticate via Google Sign-in in SPA
Introduction to AWS Cognito identity platform
Why AWS Cognito? In the ever-evolving landscape of web development, user authentication is a critical component for securing applications. While you can always roll your own, it comes with a whole set of challenges. That’s why there are many ready-to-use solutions, such as Auth0, FusionAuth, and many services that provide authentication as part of their offerings, such as Hasura.
What if we prefer not to host any backend? AWS Cognito serves as an identity platform seamlessly connected with any Identity Provider, (such as Google), enabling us to, for instance, restrict users from specific domains. Additionally, for users who sign in through SAML or OIDC federation, the price for MAUs above the 50 MAU free tier is $0.015.
In this blog post, we will create an application that:
- sets up Cognito User Pool,
- uses external Indentity Provider (Google) to federate users,
- displays the user’s email on the screen,
Before we go any further, AWS Cogito is a powerful tool, and here, we will demonstrate only one of its features. Also, as with every tool, it has its limitations, and although it will work perfectly fine in most cases if a more sophisticated claim arises, you could consider using tools such as Keycloak, Auth0, or similar tools.
Using AWS Cognito to authenticate via Google Sign-in in SPA
Requirements
We will need an AWS account, a Google account, and Node.js installed locally on our system, preferably version 18 or higher.
You might wonder why not take advantage of the AWS Amplify( framework? To keep things as simple as possible, we opted against this as it introduces additional complexity and requires deploying additional Lambda functions. We will be using the amplify npm package.
Setting up social auth
We can take advantage of the excellent tutorial on AWS Amplify Docs for creating an application with OAuth Login. This tutorial provides step-by-step guidance on setting up social authentication providers, including Google. Following this tutorial will ensure a smooth integration of social login functionality into our application. As we proceed, we’ll adapt these instructions to our specific use case, emphasizing the integration of Google Sign-In with AWS Cognito for a streamlined and secure user authentication experience.
Creating User Pool in Amazon Cognito
A User Pool is a user directory service provided by Amazon Cognito, facilitating user registration, authentication, and profile management…
First off, let’s go to the User Pool creation form:
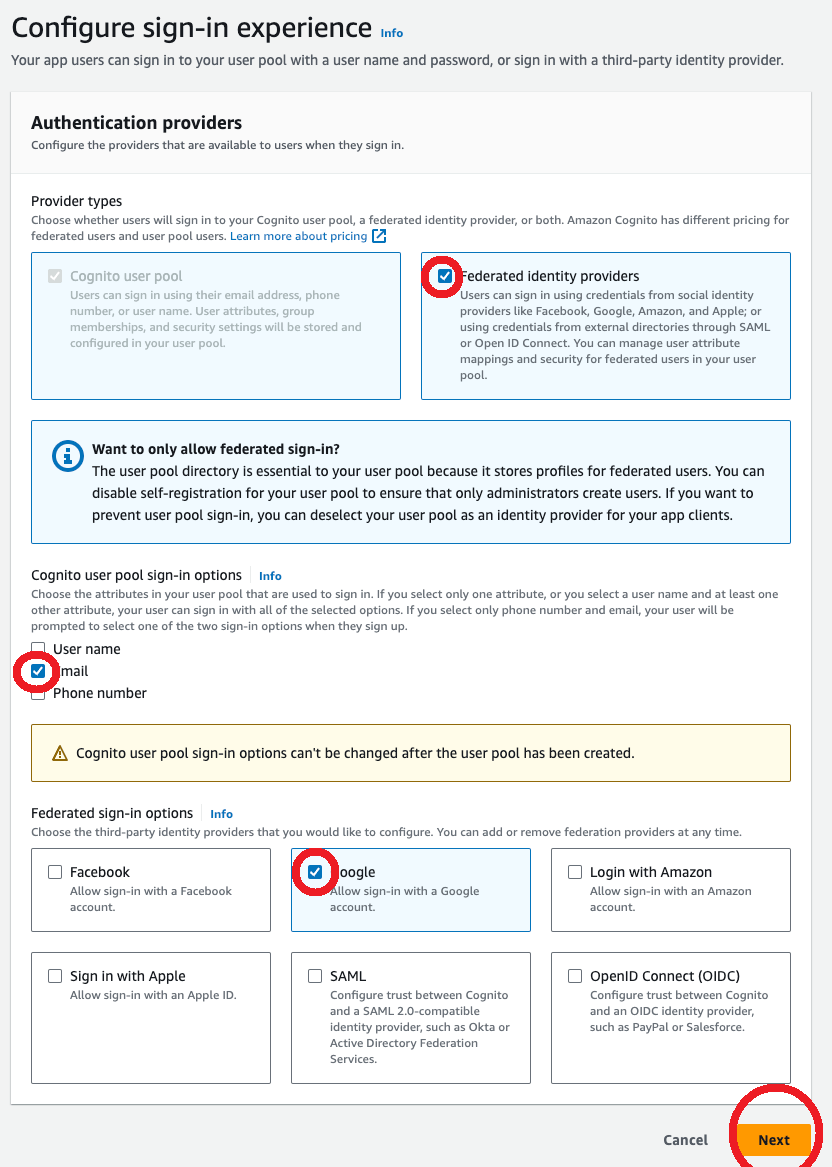
Please ensure that the ’Federated identity providers’ option is checked, including the ’Google’ checkbox. Additionally, you can utilize any OpenID and SAML provider available among the other options provided.
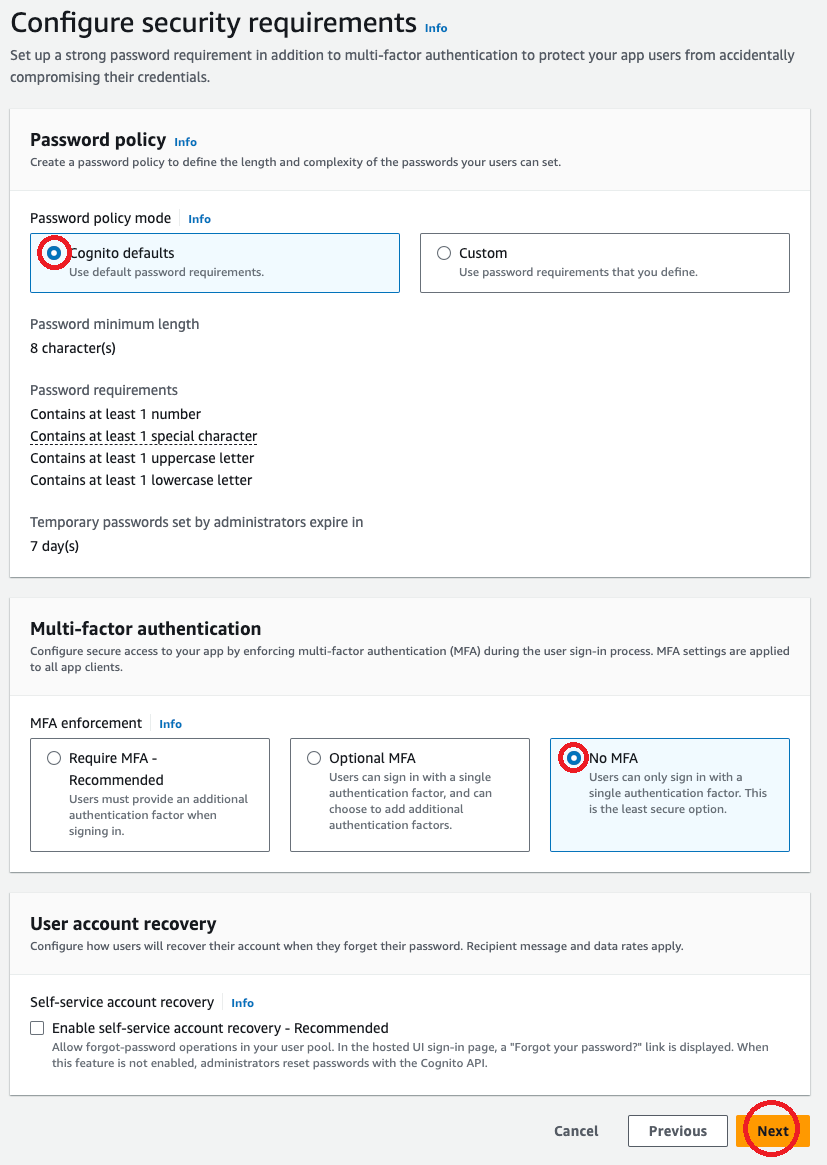
For simplicity, let’s disable MFA (Multi-Factor Authentication) and account recovery options. Since we will be using Google to authenticate ourselves, these features are not needed in this case.

We continue with self-registration and Cognito-assisted verification disabled, for the same reasons as above. Let’s not forget to select `email` in the Required attributes section since we will want to display it later.

Let’s proceed to fill in our OAuth information from Google, now we have got both Client ID and Client secret following this tutorial. Don’t forget to add `email` and `profile` to the Authorized Scopes section for comprehensive access since without those, Google won’t be able to return all of the information needed by Cognito.
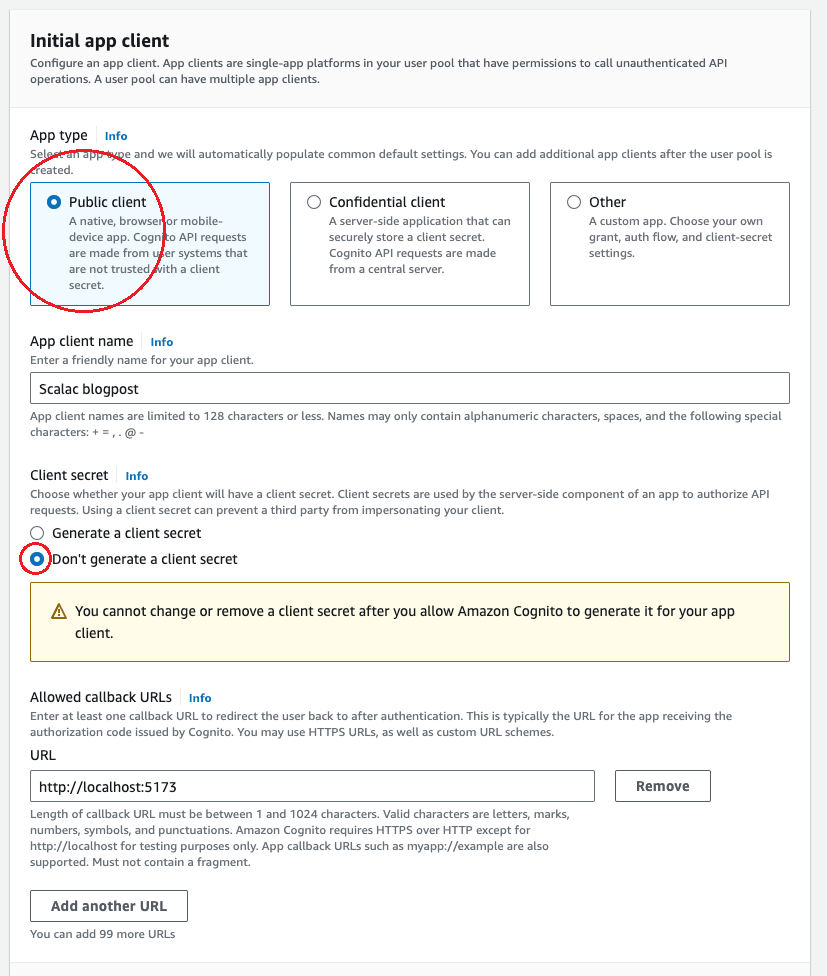
Now let’s create a User Pool name and add our demo application URL to the allowed callback URLs. Just remember to only use localhost for development, later this field should be changed. Before hitting ’Next’, we will also need to expand the OpenID scope to include Profile and aws.cognito.signin.user.admin. Despite the misleading name, it doesn’t grant any ’admin’ features. For further explanation, please refer to this Stack Overflow answer.
Update social auth
Once we have our Cognito User Pool URL (formatted as `https://<your-pool-name>.auth.<region>.amazoncognito.com`), it’s essential to update the Authorized JavaScript Origins and Authorized Redirect URIs in our Google application.

It’s crucial that we include `https://<your-pool-name>.auth <region>.amazoncognito.com/oauth2/idpresponse` in the Authorized Redirect URIs. This ensures that Cognito can successfully receive responses from Google.
Application
Setup
Now let’s proceed to create our application. We’ll start with a basic React application using Vite as the bundler.
npm create vite@latest aws-cognito-google -- --template react-ts
You can safely replace the contents of the App.tsx file with the code below:
import { useState } from "react";

function App() {
  const [email, setEmail] = useState<string>("");
  return (
    <>
      <p>Hello {email}</p>
    </>
  );
}

export default App;
Now we can install all of the required dependencies:
npm i aws-amplify @aws-amplify/core @aws-amplify/ui-react
Configure Amplify
Now we are ready to configure Amplify. We will need the Cognito domain picked in the previous steps, as well as the User Pool ID and User Pool Client ID. All of this information is available in the User Pool details under the ’App integration’ tab.


Let’s put this in the main.tsx file:
import React from "react";
import ReactDOM from "react-dom/client";
import { Amplify } from "aws-amplify"; // AWS Amplify sdk
import { withAuthenticator } from "@aws-amplify/ui-react";

import "@aws-amplify/ui-react/styles.css"; // We need to include styles for the login form displayed by the `withAuthenticator` higher-order component.
import App from "./App.tsx";

import "./index.css";

Amplify.configure({
  Auth: {
    Cognito: {
      loginWith: {
        oauth: {
          redirectSignIn: ["http://localhost:5173"],
          redirectSignOut: ["http://localhost:5173"],
          domain: "<your-pool-name>.auth.<region>.amazoncognito.com",
          providers: ["Google"],
          scopes: ["email", "openid", "aws.cognito.signin.user.admin"],
          responseType: "code",
        },
      },
      userPoolId: "<userPoolID>",
      userPoolClientId: "<userPoolClientID>",
    },
  },
});

const AppWithAuth = withAuthenticator(App);

ReactDOM.createRoot(document.getElementById("root")!).render(
  <React.StrictMode>
    <AppWithAuth />
  </React.StrictMode>,
);
We are using withAuthenticator to wrap our application; it will handle all of the authentication for us and provides props with the user object as well as a sign-out callback.
Using data from User Pool
Now we are ready to read the email address from the User Pool in our application. Here is the updated `App.tsx` file:
import { useState, useEffect } from "react";
import { fetchUserAttributes } from "aws-amplify/auth";
import { WithAuthenticatorProps } from "@aws-amplify/ui-react";

function App(props: WithAuthenticatorProps) {
  const [email, setEmail] = useState<string>("");
  useEffect(() => {
    fetchUserAttributes().then((userAttrs) => setEmail(userAttrs.email || ""));
  }, []);
  return (
    <>
      <p>Hello {email}</p>
      <p>
        You can <button onClick={props.signOut}>logout</button>
      </p>
    </>
  );
}

export default App;
Conclusion
Using AWS Cognito without any backend is not only possible but quite straightforward. With the rich AWS portfolio of services, we can use this example as a starting point to building more complex applications that can leverage those services. For example, we can easily add options to upload files to an S3 bucket, enhancing the functionality of our application. The seamless integration of AWS services allows us to expand beyond user authentication, opening up possibilities for incorporating features such as data storage, serverless functions, and more.
In the simplest scenario, customizing the login page of Amazon Cognito becomes essential. This customization extends to using your custom domain instead of the default AWS, among other possibilities. With Amazon Cognito, the flexibility to tailor authentication experiences to your specific requirements knows no bounds.
Moreover, AWS Cognito’s simplicity and scalability make it an ideal choice for applications ranging from simple prototypes to large-scale production environments. The flexibility to integrate with other AWS services enables developers to tap into a wide array of functionalities without the need for a dedicated backend infrastructure.
Of course, the FE app can use Cognito to check if a user is authenticated, but more important is to secure the backend correctly. Helpfully, Coginito integrates very well with other AWS services such as API Gateway so you can use the same Identity Provider to secure the whole application.
In conclusion, leveraging AWS Cognito in conjunction with other AWS services empowers developers to create robust, feature-rich applications without the need for managing complex backend infrastructure. The simplicity of integrating authentication, along with the scalability and extensibility offered by AWS, provides a solid foundation for building versatile and powerful applications. Safety safe study studies
You can find the source code to this application here.

Authors

I'm JavaScript and frontend developer, after some time as Full-Stack I decided to focus more on the front part of projects because it's what I enjoy the most.