
ConductR – One tool to rule them all

Part of the success of modern application is targeting it globally – all over the world. It isn’t possible to run such application on a single machine, even with most powerful hardware.
Definitions like Distributed computing or Reactive applications were born in the process of IT globalization. Nowadays, applications run on multiple virtual machines distributed over multiple physical machines which are often spread around the world. Such applications aren’t easy to maintain.
Every service has different hardware requirements and dependencies, so it has to be deployed and upgraded continuously. In addition each machine has to be configured in such a way that allows communication within the cluster and with external services. Although Devops have helpful deployment tools like Chef, Puppet or Ansible, these tasks still aren’t easy, trust me.
Reactive Manifesto
Reactive Manifesto, published a few years ago, is a paper that defines the design guidelines of modern applications which help to deal with requirements of today’s businesses. It claims that an application should be Responsive, Resilient, Elastic and Message Driven. In short: an application should keep minimal shared state, expect crashes and recover from them quickly. It should also be easy to deploy and scale.
Lightbend’s ConductR fills perfectly the Elastic part of the manifesto – it makes setup & deployment easier, while giving you enough flexibility to react on changing load.
What is ConductR?
With the rise of microservice architecture it’s easier to write reactive applications than ever before. But this power also comes with a price.
Loosely-coupled services are great when it comes to scaling production, but they also put burden on the local development. They add overhead when running, make correct setup difficult, turn local testing into ‘button mashing’ and programmers are bogged down when crossing the service boundaries (“What service should run on port X?”, “I think there’s something broken in my setup. How do I debug service Y?”…).
Of course, the increased number of moving parts also hits the architects and people working in operations. To tackle this new landscape we need to toss away old tools, which don’t work in these new conditions and employ new ones, that do. Here’s where ConductR comes in – as a modern way of managing, deploying and inspecting applications.
How does it work?

First, what you have to do, is to define nodes which will be used to deploy services. If you are afraid it’s something difficult, don’t worry – I will show you an easy example to get started. Almost all operations are doable in one command.
Once the nodes are ready, ConductR provides a cluster visualization containing the status information for each node as well as all deployed services (it depicts the location of each service). Specially-prepared scripts allow you to load or unload services onto nodes. If you load your service, ConductR pulls it onto each node and prepares it to be ready to use. It also decides which nodes should be used to run the app.
The only thing you need to do is choosing how many nodes you want to use for your service. If (because of any reason) one node crashes, all services which were running on that node are started on another one. HAProxyinstalled helps to switch traffic immediately. HAProxy works also as a load balancer – you can run service on multiple nodes and all traffic will be managed and targeted to the proper server. This way you get more resilience for free.
The last thing worth mentioning at this point is service discovery. Service discovery manages how processes and services in a cluster can find and talk to each other. This way another pain point of microservices is solved.
ConductR project consist of a few elements:
- Python scripts for managing the app
- Play app for visualization
- SBT bundle for building immutable artifacts
- Server side ConductR interfaces
I will elaborate more about each of above points, but firstly I have to describe one important topic in the context of ConductR.
Application and Bundles
Before I’ll go deeper into this topic, there are two terms that require some explanation: application and bundle.
Bundle
A bundle is a deployable piece of application which typically consists of only one component. The role and other metadata are placed in a configuration file (bundle.conf), which gives ConductR some basic knowledge about this bundle, in particular: the role of the bundle and what is required to load and run a component.
Other attributes configured in this file are: bundle’s version, name of the components, system requirements and network endpoint mappings.
You can run a bundle locally and in production without any changes.
Application
An application in the ConductR context is a collection of at least one bundle. The developer decides about shape of the application: what bundles should it run, how many instances of every node and what other services are needed.
Python scripts
The core element of ConductR stack is a script which gives a possibility to manage the application’s state from command line. Because script is written in Python you have to have it installed in your OS. conduct (the script has such name) is helpful for developer and operation teams.
Using the script you can build and package your bundles as application, deploy it onto nodes ready to run or add specific configuration parameters to your bundle.
Visualization
ConductR also has a small application on top of Play Framework, which is responsible for visualization of your stack. You can see loaded bundles, the active ones and status of the nodes. Sadly, you cannot take any actions here, but even without that, it’s very helpful.
SBT Bundle
There’s one question I failed to answer so far: what kind of applications can be deployed by ConductR. Actually, at this point this tool is mostly targeted onto Scala ecosystem – you can use all Akka based applications almost out-of-the-box. If you have a service written in Java you should try to wrap it with Lagomfirst.
Lagom and ConductR work perfectly together. Lagom allows you to split the monolith or create new services from scratch. While ConductR eases the pain of deployment and operations. This way you can add new powers to your old codebase.
But how to make our application able to run over ConductR control and communicate with other bundles? You have to add sbt plugin as a dependency to your project and configure it. Actually, almost all configuration properties have default values, so with little of luck you won’t have to change anything.
Time for Action
To show more advanced topics in ConductR, I’ve prepared small akka-http based services I’ll use in further example. You can find the source code at starting point here.
Our goal is to make this service use ConductR, so it’s easy to run locally and deploy to production.
Basic Service
Actually there is only one important file, Server.scala with following content:
https://gist.github.com/marioosh/5fa41938299d3903a3cbbeda7f390d4a
This is entire code responsible for our small service. Host and port are hard coded for now. There is no complicated philosophy here, all the server does is displaying “Welcome to microservice” text when you point server in your browser. If you want to test it, just type sbt run in console and open in browser the url: https://localhost:8080
You should see aforementioned text in the browser now.
Preparing ConductR
Now is time to prepare ConductR.
Firstly, you should install Docker if you haven’t already done it. If you need any advice in this topic you should go to docker.com website. I won’t describe this process here. Docker is the default virtualization technology used by ConductR. If you wish you can also use something else, but it’s out of the scope for this short post.
You should also install the proper version of Python – ConductR scripts are written with Python 3 and such version should be available in your system. I will skip this task. Go to Python’s website for more information if needed.
Now install proper scripts. The scripts are prepared as conductr-clipackage and available in pip’s repository, so running the following command is the only thing you need to do:
https://gist.github.com/anonymous/5b981b9d37adbc1685f10f18e8a5dbcb
After successful installation we should have two scripts available in our system: sandbox and conduct.
Sandbox is a Docker wrapper. With this script you can run ConductR as a container and be able to setup ConductR cluster easily and quickly.
Conduct is responsible for managing applications and bundles which run on a ConductR cluster.
Let’s prepare sample local cluster:
https://gist.github.com/anonymous/31cf2bd81ba375f5cbb0639dc8809822
These commands will prepare a pre-configured Docker image needed by ConductR (HAProxy, etc.).
Run the Sandbox
Time to run our local container. Open the docker console and type:
https://gist.github.com/anonymous/244a7a322164f5dabfe9cc17dda4b39b
What we see above? Docker container: – uses ConductR of version 1.1.5 (check the latest version on their page) – uses 3 nodes – exposes port 9000 (for our application) – loads mentioned in first section visualization app, – uses IP 192.168.99.100
When you are done, you can stop container with simple sandbox stop, but let’s keep it working for now.
Check the status of container:
https://gist.github.com/anonymous/25acc9ee403685c3e07852565a5530c3
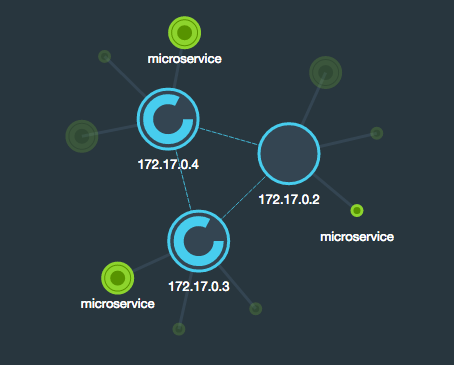
There are 3 active bundles in container, Visualizer and eslite. Eslite is elastic search bundle which is responsible for gathering logs from all nodes. We won’t cover this topic here, but if you want to know how logging works look into official documentation.
Open the browser to check what the visualizer looks like: https://192.168.99.100:9999.
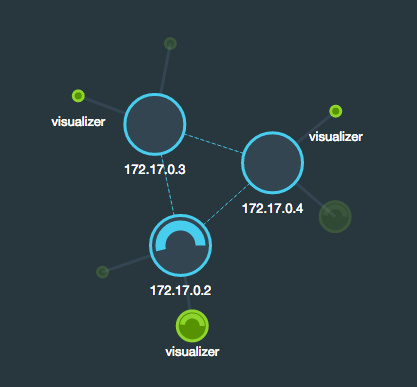
You see there are 3 nodes labeled with their internal docker’s IP. Small circle means the bundle is loaded but not active, so you can see that every bundle is loaded on every node and ready to run. Slow running circle means node/bundle is running and fast running circle – it’s loading/activating.
From command line you can use conductr info to check how many copies of bundle are replicated or running.
https://gist.github.com/anonymous/b21d288d919460152a6d521d024d0b55
Prepare our app
We need to make few small changes to our application before it can work with ConductR.
First add ConductR Plugin: add this line to your project/plugins.sbt
https://gist.github.com/anonymous/1e422a10bbfcacfe63ffe3f58ba911a4
now you have to define a few configuration properties. You can do it in two ways, either with bundle.conf file or by adding these properties in your build.sbt config file. We chose the second way:
https://gist.github.com/anonymous/71cdd81c5a867e5b527eaff3aa9efa3b
We chose for our bundle 1 CPU, 64MB of memory, small amount of disk space. There is also information that bundle should expose http port 9000 for its internal service. This bundle is also assigned the backend role. Actually, in our simple example it changes nothing, but in your application you can define which roles are available for every node, so ConductR won’t run a service on a node unprepared for it.
The next step is to activate the plugin, we can do it i.e in this way:
https://gist.github.com/anonymous/1869ad8b2a7e523cb438d38fb0fc64c0
The name of the plugin depends on what kind of application you’re trying to deploy, so check the documentation first. From now you are able to run sbt bundle:dist. This command will compile and prepare your bundle in target/bundle directory as .zip file. The service is ready to deploy, but it also has to communicate somehow with ConductR. To do that we need to add one last thing – add a dependency to build.sbt:
https://gist.github.com/anonymous/f4cb1483c02fda30311dae9233aac881
Lightbend prepared few small dependencies for common application types, that will perform all the heavy-lifting for you. Since we are using Akka 2.4 we will use akka24-conductr-bundle-lib. Newer versions, like Play 2.5, will work out-of-the-box without the need for new dependencies.
The next step is to prepare host and port for our server. As you remember we have hard coded these properties in the server file. the better way is to move it to application.conf:
https://gist.github.com/anonymous/95c62d0414d81358a79281696058ab65
microservice is the name of my app so I created section for these, but you can choose name for this block for your own. The most important part is inside this block. I’ve defined each property twice. If you’re familiar with Typesafe Config you probably know what is going on here. Config’s engine loads first property, but after that is trying to look for environment variable with name MICROSERVICE_BIND_IP (for host).
First value will be replaced when the variable is set. Where do this env variables come from? They are provided by ConductR. We can load properties which start from uppercased name of our app (like in example above), or defined per BUNDLE or even more general. You can find the entire list of variables here In this way, our application will choose port 8080 when will be run locally.
There are yet two changes we have to do in server code.
First is providing ConnectionContext as implicit constant:
https://gist.github.com/anonymous/0265d63c81c917f4de82147ee601deaa
next, call the function which informs ConductR when the application would boot up.
https://gist.github.com/anonymous/8f221ac3d01ef358bce91dd14e2b53d0
Remember to call the function when your service is ready to work, so after initialization, connecting with external services and so on.
You can find the ConductR-ready code in the repository
Build and deploy
Assuming sandbox is still running and application is ready to build, we are ready to prepare the bundle:
https://gist.github.com/anonymous/0b6c5164b17f90e69760df7bbf011d70
After that you’ll find zip file with prepared bundle within your target/bundledirectory, now we can load it into container:
https://gist.github.com/anonymous/74b8870dbd741396f1a457e7c8a525bd
and run it on one node
https://gist.github.com/anonymous/0e23d7203731690e4cfc2e0093e1bb80
That’s all.
https://gist.github.com/anonymous/ca9f35f33f571f3ceebd064d959143d4
Yep, our service is running. Open the browser and point to https://192.168.99.100:9000 to ensure of that. Actually, you should also see the app on ports 9010 and 9020 in your browser, because these are pointed to other nodes, but conductR provides a load balancer and knows where the bundle is and how to route traffic there.
What if I want to run it on two nodes? Add --scale argument to previous command:
https://gist.github.com/anonymous/4c1920ab66d30f17bef8e65f3dc11dd9
And here you go: your service runs on two load balanced nodes.
I hope you will find this short introduction to ConductR helpful. Best Regards.
Links
Do you like this post? Want to stay updated? Follow us on Twitter or subscribe to our Feed.
See also

Authors

I’m an experienced developer who has acquired a broad knowledge. I’m always ready for new challenges and learning new skills.
Popular Posts in category
Looking into Scala.js

Your first microservices using Scala and Lagom
Handling Split Brain scenarios with Akka