Event-sourced game implementation example – Part 2/3: Building web application

Welcome to the 2nd part of the event-sourced game post series! In case you haven’t yet read the previous part, I highly recommend reading it before.
Today we’ll focus on the frontend server part, the one that’ll be responsible for handling user interface interactions as well as backend server communication.
What do we have so far?
Quick recap of what has been done so far in part 1:
- we’ve implemented a backend server that lets us play games using its REST API
- we’ve been able to peek at generated game events in the RabbitMQ console
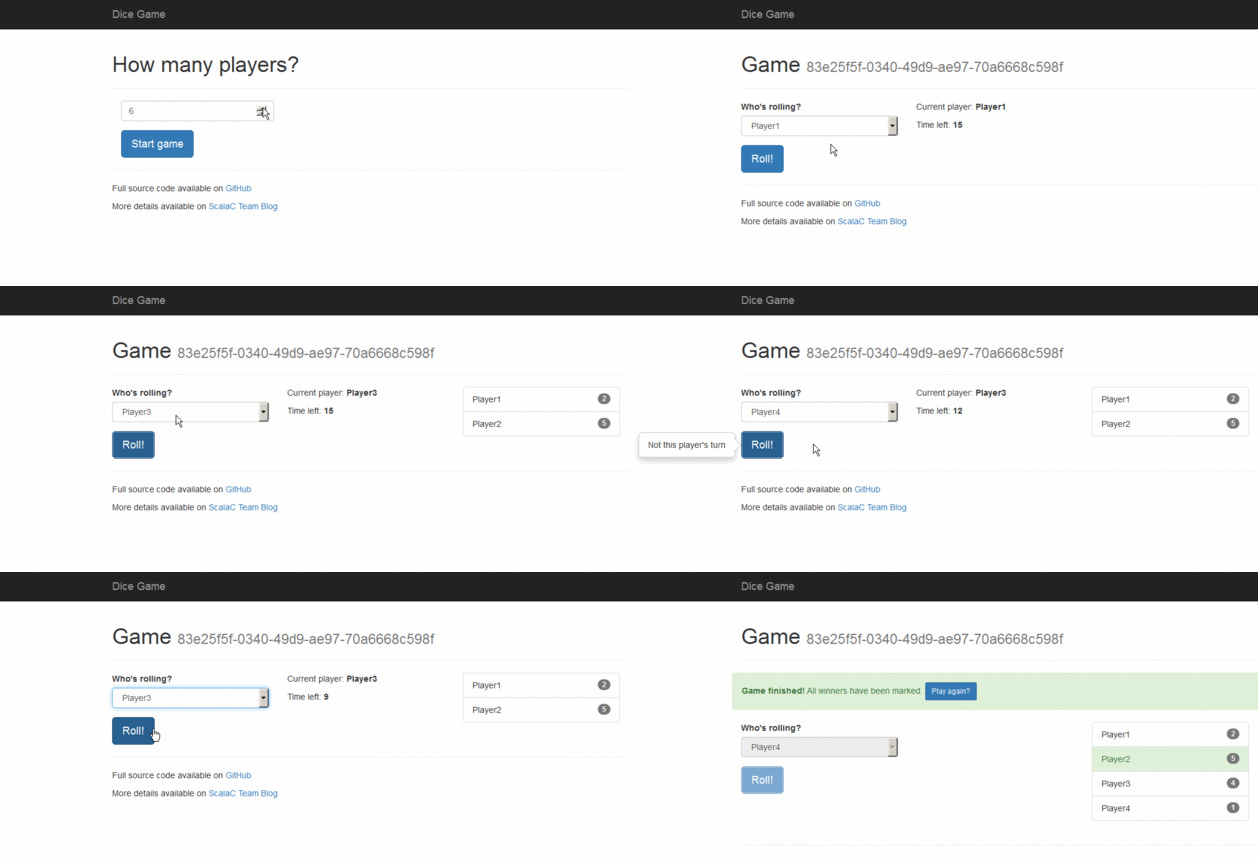
Now it’s time to create a UI that’ll seamlessly combine the two to create a decent user experience. Here’s what it will look like:
For this, we’ll use:
- Play! Framework as our frontend server
- WebSocket for real-time browser <-> frontend server communication
- Reactive rabbit to receive game events from RabbitMQ
- AngularJS on the UI side
The action flow from the UI point of view will be as follows:
- the user creates a new game (the command is sent)
- the game is created (the response is received)
- UI binds itself to events from a newly created game (WebSocket connection is created)
- the user chooses the players count and starts the game (the command is sent)
- GameStarted event is received through WebSocket connection, the UI is updated
- the user chooses the player and rolls the dice (the command is sent)
- DiceRolled events are received, the UI is updated
Looking at these, our Play! the server will need to handle:
- routes to execute commands
- WebSocket route to receive events from a given game
Controllers
First, let’s add these routes to our Play! application:
https://gist.github.com/LukasGasior1/e0a1e0a583d0c94aa0a2
POST ones are for commands and the GET route is for websocket connection. Let’s take a look at the implementation.
Commands routes:
https://gist.github.com/LukasGasior1/699439c80d69e3a8d961
Nothing special here, commands are just forwarded to our backend server (with some additional responses mapping).
Websocket route is a little bit more complex:
https://gist.github.com/LukasGasior1/0ba40bdc10b11fc9890e
acceptWithActor takes two type parameters: one for incoming messages (it’s just a String, since we don’t send anything to the server anyway) and another for outgoing messages, which are GameEvents.
https://gist.github.com/LukasGasior1/219562e4999fe9882a26
To make it work that way we need to tell Play! how to actually send GameEvent through WebSocket. It’s done by bringing implicit FrameFormatter[GameEvent] to the scope. We’ll format GameEvents as JSON and use FrameFormatter.jsonFrame which Play! provides:
https://gist.github.com/LukasGasior1/2cc0919c1f6f8d94de0e
What’s next in acceptWithActor is a method that takes a HTTP request and an ActorRef out (which is used to send messages from server to client) and returns Props to create WebSocket connection handling Actor. We’re telling it to create one WebsocketEventPublisher for every WebSocket connection, we also pass out reference to it, which it can later use to send messages through the connection.
Receiving and passing events
Let’s have a closer look at WebsocketEventPublisher.
https://gist.github.com/LukasGasior1/71905a731b7e3ffae9f1
[WebsocketEventPublisher.scala]
What we do, when the actor starts, is create a new queue and bind it to the events from given game. It’s the last parameter in queueBind – argumentswhich says “hey, I want to receive only events from the game with id == gameId”.
Once the queue is bound, we create a Source out of it, which we attach Sinkto. Our sink is an EventSubscriber actor, which will receive every incoming event (or, at this point, rather a message that represents an event).
https://gist.github.com/LukasGasior1/b6e3c56a6660f92c4681
Once it receives an event, it’ll pass it back to WebsocketEventPublisher(that’s why we pass self reference to its props).WebsocketEventPublisher will pass it further, to out reference (which will use FrameFormatter to serialize the message and send it through WebSocket connection).
https://gist.github.com/LukasGasior1/077848adbcced014686e
[WebsocketEventPublisher.scala]
requestStrategy in EventSubscriber tells streams implementations how many more messages the actor wants to receive.
Here it’s implemented to always be at least 1, meaning we want to receive as many messages as there are. It may not however be always appropriate elsewhere. I don’t want to focus too much on back pressure in this post, so we’ll just stick with this.
Those watchful may say that it doesn’t look good to pass these rather backend-side events directly to the browser. It’s true, usually, some additional processing/validation would be added before passing them to WebSocket, but it’s not necessary for our simple application.
Frontend part
Now that we have our backend stuff ready, let’s see how can we use it on the frontend.
Services
Let’s start with two Angular services:
- one for sending commands (create game, start game, roll the dice)
- and another for subscribing to events for a given game (using our WebSocket endpoint)
Here’s what they both look like:
https://gist.github.com/LukasGasior1/5ce253c2b5883c4e3f5e
There’s really nothing special here, I won’t even comment the command part – these are just http POSTs.
On the event side, we simply broadcast every incoming message, were the name parameter of $broadcast contains an event type so that we can later easily listen for a particular game event.
Controllers
User at given time can see one of three pages (stored in rootScope):
https://gist.github.com/LukasGasior1/2db627504b5f4b05d487
This variable determines the currently shown content (and used controller) with ng-switch:
https://gist.github.com/LukasGasior1/119509464e1f5b69c20b
Each controller handles a different set of user actions, let’s examine them:
The first one is CreateGameController:
https://gist.github.com/LukasGasior1/d35f97c542e9b9edce0f
It’s really simple. It just POSTs to create a new game and upon success connects the event service to the event stream, changing the currently shown page to choose_players with corresponding StartGameController:
https://gist.github.com/LukasGasior1/1de52db3ba21e527bb71
This gives the user the possibility to specify players’ count and handles the “Start game” button click. It also shows a popover in case of an error.
If there were no errors and the game was started, GameStarted event is handled in the main application:
https://gist.github.com/LukasGasior1/4684351014ca1ef80b87
The game state is stored in the game variable in rootScope and is updated according to the events received:
https://gist.github.com/LukasGasior1/b37c561fe0541afa4488
Finally, we have GameController that handles user inputs when the game is running:
https://gist.github.com/LukasGasior1/a1ba2a8902404346d0bb
It also listens to game events to update the view accordingly. When the game is finished the “Play Again” button is visible which, upon clicking, redirects the user back to the “create” view.
You can find all the related views in index.scala.html file.
Summary
That’s it for the 2nd part. Our game is ready :)
We can now consume events from RabbitMQ and send commands to our backend server. Both functionalities are seamlessly integrated into our modest interface and the distinction is invisible to the user. But the fun is not over yet. In the 3rd part, we’ll see how easy it is to grab some statistics from the games played and expose collected data.
As usual, the full source code is available on GitHub.
Other parts:
- Event-sourced game implementation example – Part 1/3: It’s time to play
- Event-sourced game implementation example – Part 3/3: Grabbing some data – statistics service
Links
Do you like this post? Want to stay updated? Follow us on Twitter or subscribe to our Feed.
See also

