Websockets Server with akka-http
If you’re looking for the best library to build concurrent and distributed applications, probably sooner than later you’ll come across Akka. It’s a very powerful open source library maintained by Typesafe for making such apps.
If you’re looking for a good library to build concurrent and distributed HTTP Server (or Client), you will probably find Spray. It’s a well-designed and mature Akka-based HTTP implementation. In short, Spray offers immutable http-model, based on case classes, with efficient logic for HTTP parsing and rendering. It also has a powerful DSL REST API definition with complex testkit for it. Spray will fit your needs in most cases.
Spray a has few caveats: it is hard to understand and debug structures based on implicits and its Routing DSL can become unintuitive in some cases. But the big miss is its lack of websocket support. It also makes it hard to deal with chunked or very large requests, and such features are quite often desired by modern applications.
Typesafe wanted to take Spray’s heritage, clear out bad things and release it as a powerful HTTP library. And they made it as akka-http (also known as Spray 2.0). What has changed? Under the hood – a lot. The core is based on akka-streams now, so it’s easier to manage data streams and process them concurrently. On the other hand, lightweight High level routing DSL API from Spray was kept.
There’s also one, very important addition: like with the other akka libraries, you get Java API if you aren’t a Scala guy or gal.
Our goal
The goal is to show how to use akka-http API to build a Websocket server. To do that, we will use akka-streams to process incoming and outcoming messages. Finally we’ll write basic Websocket client to help us with testing the server (sadly, akka-http doesn’t support websocket client yet, and we have to use another library for this).
Stage 1 – WebServer
Let’s start our project. All you need to start is add com.typesafe.akka-akka-http-experimental to your dependencies. At the time of writing of this article, the most recent version is 1.0
Server code:
object Server extends App {

  implicit val actorSystem = ActorSystem("akka-system")
  implicit val flowMaterializer = ActorMaterializer()

  val interface = "localhost"
  val port = 8080

  import Directives._

  val route = get {
    pathEndOrSingleSlash {
      complete("Welcome to websocket server")
    }
  }
  val binding = Http().bindAndHandle(route, interface, port)
  println(s"Server is now online at https://$interface:$port\nPress RETURN to stop...")
  StdIn.readLine()

  import actorSystem.dispatcher

  binding.flatMap(_.unbind()).onComplete(_ => actorSystem.shutdown())
  println("Server is down...")

}
Time to explain few things. akka-http is based on Akka and, like everything dependend on this library, needs ActorSystem to run. There is no difference here, in first line we instantiated one. In the next line you can find another implicit constant – flowMaterializer. Like Actor needs ActorSystem – Flows needs Materializer to operate.
But wait. What is Flow? Flow is a part of akka-stream, and in short: Flow is a pipe for transporting data; we will discuss it in more detail later on.
Most of the code is self-explanatory, so let’s concentrate on ‘route’. For every server instance you need to define routing. Routing is a set of server rules. It’s a schema that defines what to respond with to specific request. You can filter requests by URL, parameters, HTTP Method and so on. Importing Directives._ allows us to use nice and simple DSL for writing these rules. Every routing definition should be of type Route. The example above states that we should only respond to https://localhost:8080 and https://localhost:8080/ URLs, fetched with HTTP GET method. Run the server with sbt run and point your browser to the address above. You should see a Welcome message sent by our server.
Stage 2 – basic websocket
Prior to WebSockets, the only way to use HTTP was to send stateless requests. We tried to emulate state and persistent connections to server by techniques like cookies and long polling, but sometimes these were hard to work with. WebSockets were a game changer. In WebSockets, both sides of the comunication – the server and the client – can send and receive data. With this, it’s far easier to build rich experiences for end users.
In most cases, websocket channel runs through an upgraded HTTP/s connection.
Websockets allow sending data both sides, but there is no option to transport more than one message in the one direction at the same time. And because message size is not known (theoretically it’s possible for it to be infinitely long), the data of the message is represented as a stream.
In akka-httpimplementation, websocket transmission is divided into small pieces, and one such piece is represented by Message trait. You can send two types of message data – String or ByteString. Both types have proper subtypes of Message, accordingly: TextMessage and BinaryMessage.
Both of these subtypes also have their own Strict subclasses that contain raw data (String or ByteString) which is a natural choice for sending completely assembled messages. When an akka-http server receives a message through a WebSocket stream, it tries to bundle the data as an instance of the Strict class if it’s possible (i.e if complete data was received in one part). If it’s not possible, it can also handle streamed data.
When implementing a server, keep in mind the Strict means complete data; if you want to be prepared for incompleted data – and I suggest you do – the streamed messages should also be handled.
Core implementation and handshaking
If you want to upgrade your connection to websocket, your implementation should include akka.http.scaladsl.model.ws.UpgradeToWebsocketheader in every initial request. If the Server gets request with such header, connection is able to upgrade to a websocket connection. In this case, the server will have to provide a proper Flow to handle websocket messages.
Response for these messages is made by these header functions. UpgradeToWebsocketalso handles Handshaking(protocol negotiation), but it’s well hidden in the application and you don’t need to know all the details.
It was quite a large part of rough theory so now it’s time to add websocket suport to our server.
Let’s try to do simple echo server that sends back incoming messages. First we need to prepare another endpoint for that. In our example, echo-websocket will be accessible under ws-echo path. First we modify the route:
val route = get {
    pathEndOrSingleSlash {
      complete("Welcome to websocket server")
    }
  } ~
  path("ws-echo") {
    get {
      handleWebsocketMessages(echoService)
    }
}
Tilde (~) is used for composition of few routes in one rule, path("ws-echo")defines which path we want to process in this rule, get as above is HTTP GET method. handleWebsocketMessages method will upgrade connections to websockets using echoService handler that we will implement shortly.akka-http under the hood uses akka-streams for data processing. To handle wesocket messages you should also use such stream.
To be more precise, in this case you wil have to use Flow[Message, Message, Any]. So, akka-httpwebsocket handler includes a stream which is waiting for Message at input and offers Message at output.
val echoService: Flow[Message, Message, _] = Flow[Message].map {
    case TextMessage.Strict(txt) => TextMessage("ECHO: " + txt)
    case _ => TextMessage("Message type unsupported")
}
Yep, that’s all. It’s a proof that Websocket is easier to do than to explain :)
Time to test it. Start the server and websocket client. We didn’t make one ourselves yet, so use something external like Dark Websocket terminal or Simple Websocket Client (both available as google chrome extensions).
You should achieve similiar result as on the image below:
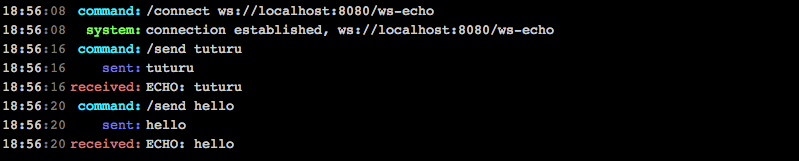
Current app stage can be found here
Stage 3 – Multichannel Chat
Having the understoanding of the basics, we can move to something more complicated – multichannel chat. First, let’s create a ChatRoom – class for keeping user information.
class ChatRoom(roomId: Int, actorSystem: ActorSystem) {

  private[this] val chatRoomActor = actorSystem.actorOf(Props(classOf[ChatRoomActor], roomId))

  def websocketFlow(user: String): Flow[Message, Message, _] = ???

  def sendMessage(message: ChatMessage): Unit = chatRoomActor ! message

}

object ChatRoom {
  def apply(roomId: Int)(implicit actorSystem: ActorSystem) = new ChatRoom(roomId, actorSystem)
}
ChatRoom class will be created for each separate room. Inside the ChatRoomclass is an actor which is keeping endpoints for every connected user. There is also sendMessage helper which redirects incoming messages to inner actor. ChatMessage is a simple case class that holds the content of the message and its author. For now let’s ignore websocketFlow. It will be explained later on, when discussing akka-streams.
Next we will add a class to hold all the rooms. I’ll use simple Map[Int, ChatRoom] for this. We want to make it as simple as possible.
object ChatRooms {
  var chatRooms: Map[Int, ChatRoom] = Map.empty[Int, ChatRoom]

  def findOrCreate(number: Int)(implicit actorSystem: ActorSystem): ChatRoom = chatRooms.getOrElse(number, createNewChatRoom(number))

  private def createNewChatRoom(number: Int)(implicit actorSystem: ActorSystem): ChatRoom = {
    val chatroom = ChatRoom(number)
    chatRooms += number -> chatroom
    chatroom
  }

}
In this singleton class there are only two members: createNewChatRoom and findOrCreate. I think functions are self-explanatory, so we can go further.
Chat service should know which room it should connect to. This is the reason why room number should be included in the URL. Assume the correct path to our chat room is /ws-chat/XXX?name=YYYY where XXX is room number and YYY is an username. In real application it would be a little more complicated, but we will keep the example simple ;)
Time for route definition.
pathPrefix("ws-chat" / IntNumber) { chatId =>
    parameter('name) { userName =>
      handleWebsocketMessages(ChatRooms.findOrCreate(chatId).websocketFlow(userName))
    }
Few words of explanation. Our route consists of two directives. pathPrefixmakes sure to match every url starting with “ws-chat” followed by a slash character and then an Integer. The parameter directive matches and extracts “name” query parameter, which in this case is obligatory (for more informations about paramteres go here).
Having all the data extracted we look up a chat room or create a new one. handleWebsocketMessages was explained above, in short, it’s a handler for websocket connection. This function is provided by ChatRoom and we didn’t create it yet.
Now let’s take a look at ChatRoomActor.
class ChatRoomActor(roomId: Int) extends Actor {

  var participants: Map[String, ActorRef] = Map.empty[String, ActorRef]

  override def receive: Receive = {
    case UserJoined(name, actorRef) =>
      participants += name -> actorRef
      broadcast(SystemMessage(s"User $name joined channel..."))
      println(s"User $name joined channel[$roomId]")

    case UserLeft(name) =>
      println(s"User $name left channel[$roomId]")
      broadcast(SystemMessage(s"User $name left channel[$roomId]"))
      participants -= name

    case msg: IncomingMessage =>
      broadcast(msg)
  }

  def broadcast(message: ChatMessage): Unit = participants.values.foreach(_ ! message)

}
Such actor is kept in every CharRoom instance separately; it manages only the needed types of messages. We also use it for storing user data. Keep in mind that the ActorRef in participants map is a websocket endpoint for connected client.
There is only one missing point in our simple chat project, but before we continue, let’s review how the entre workflow works. If the client hits /ws-chat/123?name=Mario url, application tries to find ChatRoom instance for room 123, if it can’t find a room that already exists, it creates a new one.ChatRoom takes function websocketFlow for user Mario and uses it as a websocket connection processor.
Lets assume some scenarios: – If a new message comes through the websocket connection, it should be sent to inner actor of our ChatRoom for propagation. – If websocket is created, it should create a new actor and register it into proper ChatRoom instance with client’s (user’s) name. Still a lot of things to do. I think now it’s good time to talk a little about streams.
Few words about akka-streams
In short akka-streams is a concurrent data processing library in line of Reactive Streams initiative. With akka-streams you are able to build an entire data processing pipeline using small blocks. The main feature of this library is back-pressure, which allows consumers to control how much data they are given by producers. It prevents buffer overflows which often result in OutOfMemoryError errors.
In context of akka-streams you need to know only 4 basic definitions: Source, Sink, Flow and Graph. All of them are the blocks used to build data process pipeline. – Source has no input and only one output, so it’s used as a starting point for our data. – Sink has no output and only one input, so it’s used as an endpoint for our data. – Flow and Graph are blocks between Source and Sink.
The difference between both is the first have exactly oneinput and one output, Graph has no such restrictions. All the blocks are customizable and multilevel, so for example, we can use multiple Sources and Graph to make one Source. Such structure is called Shape and it is a common abstract class ancestor for every mentioned block type.
One more thing you should know is that the constructed shape is only a blueprint for future uses. It’s not executed directly while being created. Additionally, not all processed data is accessible inside a structure. If you have to use such data, you have to materialize it before use.
In our application, Source and Sink are provided by the library. Both produce/consume objects of type Message. So, all we need to process all websocket data is to make Flow that takes one message (which is delivered from the client), process it, and return another message (which is sent to the client).
So it’s time to look into our final function:
def websocketFlow(user: String): Flow[Message, Message, _] =

//Factory method allows for materialization of this Source
Flow(Source.actorRef[ChatMessage](bufferSize = 5, OverflowStrategy.fail)) {
  implicit builder =>
    chatSource => //it's Source from parameter

      //flow used as input, it takes Messages
      val fromWebsocket = builder.add(
        Flow[Message].collect {
          case TextMessage.Strict(txt) => IncomingMessage(user, txt)
        })

      //flow used as output, it returns Messages
      val backToWebsocket = builder.add(
        Flow[ChatMessage].map {
          case ChatMessage(author, text) => TextMessage(s"[$author]: $text")
        }
      )

      //send messages to the actor, if sent also UserLeft(user) before stream completes.
      val chatActorSink = Sink.actorRef[ChatEvent](chatRoomActor, UserLeft(user))

      //merges both pipes
      val merge = builder.add(Merge[ChatEvent](2))

      //Materialized value of Actor who sits in the chatroom
      val actorAsSource = builder.materializedValue.map(actor => UserJoined(user, actor))

      //Message from websocket is converted into IncommingMessage and should be sent to everyone in the room
      fromWebsocket ~> merge.in(0)

      //If Source actor is just created, it should be sent as UserJoined and registered as particiant in the room
      actorAsSource ~> merge.in(1)

      //Merges both pipes above and forwards messages to chatroom represented by ChatRoomActor
      merge ~> chatActorSink

      //Actor already sits in chatRoom so each message from room is used as source and pushed back into the websocket
      chatSource ~> backToWebsocket

      // expose ports
      (fromWebsocket.inlet, backToWebsocket.outlet)
}
This function contains a lot of members and each of them needs some explanation.
In akka-streams each stream element has ports; port for incoming messages is of type Inlet and port that pushes outgoing message is of type Outlet. In function above we should return type Flow, so it’s an element with only one inlet and one outlet.
First element of our structure is fromWebsocket and the last is backToWebsocket. Both are flows, and because Flow hasn’t exposed ports directly, you must wrap it with builder.add available implicitly inside this factory method. Because we did it, last element of structure is return type of Tuple2 with defined incoming and outgoing ports of the entire flow.
If you want to connect two ports, you have to use such functions like via, toor addEdge. Shortcut for these is ~> sign. For instance chatSource ~> backToWebsocket means that chatSource’s outlet is connected with backToWebsocket’s inlet, in other words: Everything that is returned by chatSource is pushed to backToWebsocket.
Helpfuly both elements have only one proper port, otherwise you should define directly which ports should be used. In the function above you can see merge.in(0) and merge.in(1) elements. Merge has two incoming ports and one outgoing port, so in every case you want to push message to one of the incoming ports, you are obliged to choose which one it is.
In general, when we’re creating this Flow, it should do two things: register an Actor that is used as entry point for a websocket channel, and send every incoming message to the ChatRoom. Because this function is inside ChatRoom, we already have access to the inner Actor which is responsible for broadcasting messages to every user in the room. The same actor keeps information about connected users.
We have two ways of connecting our custom actor with the stream. You can create your own actor which extends ActorSubscriber. In this case you have to define our entire message’s processing flow manually. But if functionality of such actor isn’t so complicated, you can use a simpler way. Sink.actorRef[T] creates Sink with inlet of type T. All incoming messages are sent to the actor which is provided as the first parameter of the function. Second parameter defines the message what is sent to this actor while stream is completed.
val chatActorSink = Sink.actorRef[ChatEvent](chatRoomActor, UserLeft(user))
In this fragment of code we’re creating a Sink which is sending all incoming messages of type ChatEvent to the chatRoomActor. When stream completes (user client disconnects) it will send a UserLeft event. Connecting our Actor to stream as source is similiar. You can use ActorPublisher as parent and add your message processing code, or use simple Source.actorOf.
Although both actorRef functions are similiar – both create an Actor instance- parameters in both cases are different: Source doesn’t need to provide a custom actor. Instead, it needs the size of a buffer and strategy to manage its overflow. It’s enough information to create an anonymous actor which accepts all messages of defined type and sends them to the stream.
I’m using such actor as a starting point for all incoming messages. To do so, we need to register this actor inside ChatRoom. We have already defined ChatEvent responsible for doing this work. All we need to do is wrap this actor inside a UserJoined class. But inside the flow not everything is accessible. Imagine the Flow definition as a blueprint which will be used while the stream runs.
From this point of view you don’t know what kind of data will be inside the stream. If you want to work directly with values flowing through the stream, you will need to materialize them. When Source is initialized inside construction block, it isn’t accessible by Stream Materializer. But, we put our source as parameter of factory method. In this case, it can be materialized later.
val actorAsSource = builder.materializedValue.map(actor => UserJoined(user, actor))
Allow us for actor’s materialization and sends it inside Event object.
In the function above, we created and attached our ChatRoom instance as Sink of the flow. This actor broadcasts every incoming message to all registered clients. In the flow we have two message sources: all incoming messages from controller’s websocket handler, and selfgenerated Event responsible for registering this new WebSocket client. Both sources are merged and messages from both are sent to the sink.
After registering actor as websocket endpoint, this actor is also responsible for sending messages back to the client.
Stage 4 – Websocket Client
The last stage is to write a Websocket Client. For basic purposes we want to make a client that connects to a websocket server, listens on a connection and logs every message to console. Also, from time to time, it sends short messages to the server.
Sadly akka-http doesn’t support WebSockets on the client side. Maybe it’ll change in the future. But for now I have to use another library. I decided to use Java Websockets
class WSClient(url: String, name: String, actorSystem: ActorSystem) extends WebSocketClient(new URI(url), new Draft_17()) {

  override def onMessage(message: String): Unit = println(message)

  override def onError(ex: Exception): Unit = println("Websocket Error: " + ex.getMessage)

  override def onClose(code: Int, reason: String, remote: Boolean): Unit = println("Websocket closed")

  override def onOpen(handshakedata: ServerHandshake): Unit = println("Websocket opened for name=" + name)

  def spam(message: String, numberOfTimes: Int = 1000) = {
    val talkActor = actorSystem.actorOf(Props(new Actor {

      import actorSystem.dispatcher

      import scala.concurrent.duration._

      var counter: Int = 0

      override def receive: Receive = {
        case message: String =>
          counter = counter + 1
          send(s"[$name] message #$counter")
          if (counter < numberOfTimes)
            actorSystem.scheduler.scheduleOnce(rand.seconds, self, message)
      }

      def rand: Int = 1 + Random.nextInt(9) //message every 1-10 seconds
    }))

    talkActor ! message
  }

}

object WSClient {
  def apply(url: String, name: String)(implicit actorSystem: ActorSystem): WSClient = {
    new WSClient(url, name, actorSystem)
  }
}
It’s a short piece of code. Most important logic is within extended WebSocketClient. We initialize it with chosen url and Draft_17 as protocol to use for connection (Draft 17, was copied as official RFC 6455 standard). All we need in this class is to override four methods – callbacks for messages and connection events. There is also spam function which creates an anonymous actor instance and sends a particular amount of messages to the WebSocket channel.
I modified Server class that runs the client when you add with-clientparameter to start command.
You can find the entire code in our repository
Summary
Over the entire article, I tried overview akka-http as a library ready to build a reactive HTTP server. There is also a few words about akka-streams in general and about websockets standards. We built a ready-to-use websocket server. You can run it on your own machine or use it as basis for a larger websystem.
If you want to run it in a command line:
sbt run
If you want to run Server with a background Client, use:
sbt "run with-client"
Links
Do you like this post? Want to stay updated? Follow us on Twitter or subscribe to our Feed.
Read more on blog
See also

Authors

I’m an experienced developer who has acquired a broad knowledge. I’m always ready for new challenges and learning new skills.
Popular Posts in category
Looking into Scala.js

Your first microservices using Scala and Lagom
Handling Split Brain scenarios with Akka