
User Authentication with Keycloak – Part 2: Akka HTTP backend
Welcome to our second article about Keycloak Server! Previously, we’ve learnt to setup the server and make use of it in a webapp -this time, we’re going to create a matching back-end API and also learn a little bit about the OAuth2/OpenID magic that powers our entire authn/authz mechanism. So let’s get started!
Fixing the frontend
I’m assuming you’ve followed the first part of our tutorial and are therefore familiar with the simple webapp we created there. A few changes will be needed (feel free to check out the modified code) – let’s add the QueryAPI component, which we’ll use to call our back-end: https://gist.github.com/kmikulski/e15e59691b7b89ca6c230b64e8e22913 As you can see, most of this isn’t too complicated. It just renders a button and below it a placeholder div which upon completion of a query is filled with the response from the server. The query is run against the https://localhost:9000/users endpoint (normally, you’d probably want to externalize the URL to a config file), which we’ll be creating in a moment. One thing that’s of particular importance to us is the optional authorization header: https://gist.github.com/kmikulski/98a268269a3f638a5e37bbf51cf7e907 Access tokens are what Keycloak (and other OAuth2-compliant solutions) uses to establish a user’s identity and authorization level. They can work interchangeably either by being provided as cookies or as request headers, as you can see in the example above. We’ll talk more about this later – for now, note that this header is included optionally, based on whether or not we provide a Keycloak object to the component. We’re doing it this way so that we can later demonstrate what happens when a request is NOT properly authorized.
Building the service
Let’s move on to creating our backend API. We’ll go with Akka HTTP on this one, since it’s arguably the most popular choice out there. As usual, you can check out the ready-made code if you’re in a hurry – otherwise, please follow along. Let’s start with a Giter8 template for Akka HTTP, so most of the boilerplate is generated for us:
sbt new akka/akka-http-quickstart-scala.g8
The first thing you’ll need to do is to add the necessary dependencies to your build.sbt: https://gist.github.com/kmikulski/fdc6354821760656c2f7c38e8c5b53fd#file-post-scala We’ll need proper CORS handling for requests coming from our frontend, so let’s add a trait for this: https://gist.github.com/kmikulski/f2a294c9df3eb733f2b75bf83ec22d0d#file-post-scala We can now add it to the existing QuickstartServer, making sure that possible authorization errors have proper headers as well: https://gist.github.com/kmikulski/272f5c86c519b0cd19ce92a28ff4d64c#file-post-scala Finally, let’s put some dummy data into our UserRegistryActor so that we can actually serve something through our service: https://gist.github.com/kmikulski/7718840b660770edce5e97fbbc45b876#file-post-scala
First look at the big picture
Let’s stop here for the moment and test how our entire setup is working so far.
- Make sure that the docker container with your Keycloak instance is up and running (if you’re running a fresh one, you’ll need to define the client and the user as described in the previous post),
- start the webapp (
npm start) and - start the back-end (
sbt run).
As a first step, try querying the API from the initial (unsecured) component level – we’re not enforcing authorization on the back-end yet, so it should work without a hitch. You can open dev tools to inspect the request: 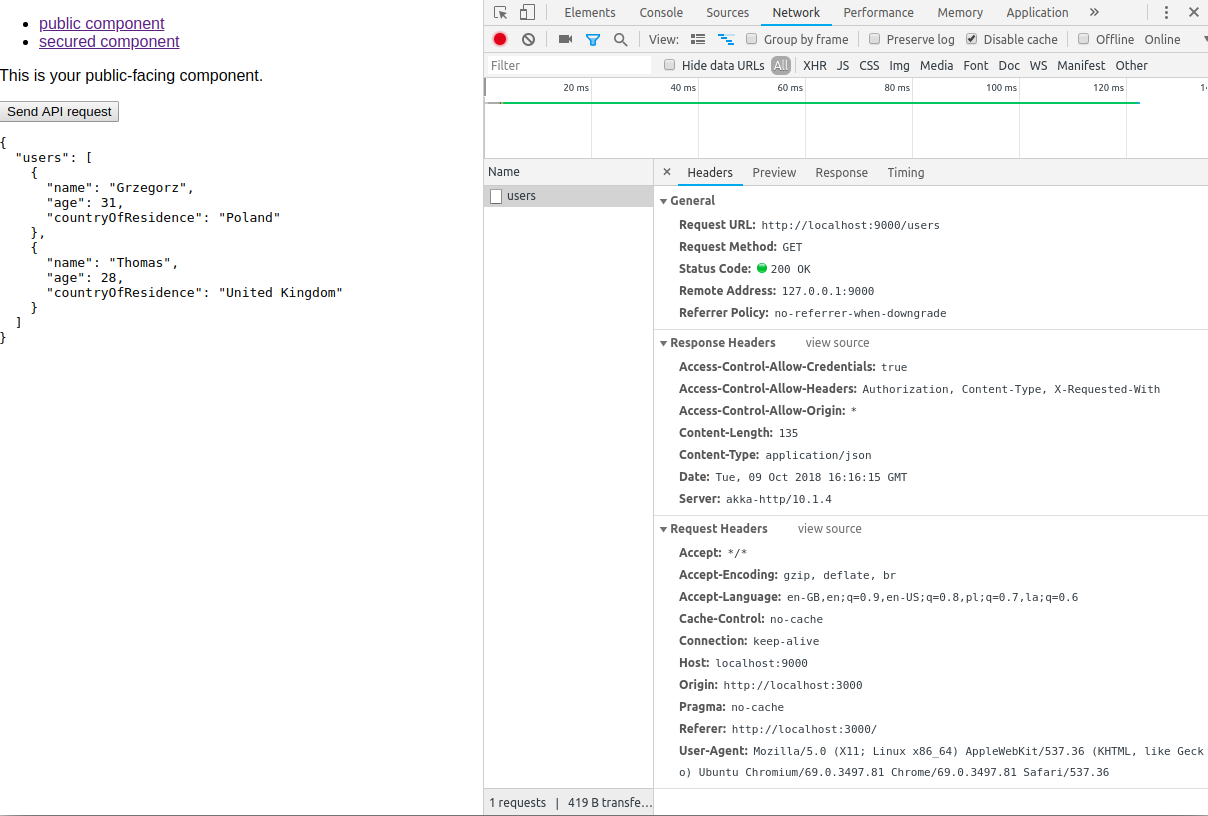 Now switch to the secured component (log in using the credentials for the user you created previously), and try doing the same. You should see one major difference in the request headers this time:
 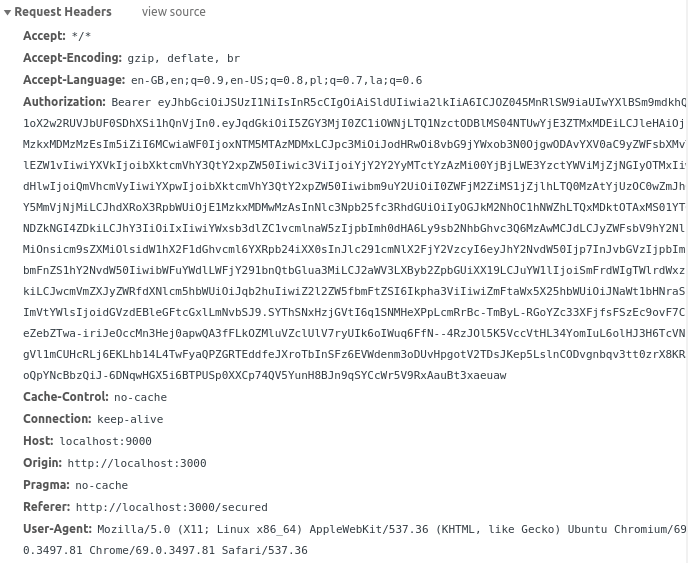 This jumble of characters is the
 access token that we retrieved from Keycloak earlier in our JSX code. As mentioned before, they’re used by OAuth2-compliant solutions (Keycloak among them) to establish a user’s identity and authorization level. If you’d like to learn more about OAuth2 and the different ways that tokens are issued (grant flows), I highly recommend the appropriate section on Aaron Parecki’s website. So, now we know how to get a token from Keycloak and attach it to a request – how can we now verify on the back-end side that this token is indeed valid and not just some random string? Essentially, there are two ways to do this. The obvious one is to simply ask Keycloak about it. We can do this using the token introspection endpoint that Keycloak provides. This is a completely viable option and in fact is often used in those OAuth2-based systems that require fine-grained server-side control over tokens (e.g. the possibility to arbitrarily revoke a single token). However, this method requires a separate call to Keycloak every time we want to verify a token (unless we include some caching mechanism on the client side, which would introduce yet another layer of complexity). In most cases, a different method would suit us far better. Keycloak also uses the OpenID protocol, which is an extension atop OAuth2. This means that every access token is a JSON Web Token that holds signed, base64-encoded user information in itself. If you look again at the token attached to our request, you’ll be able to see two dots in its body which separate it into three parts: https://gist.github.com/kmikulski/89df5bf4bbb54642195a0b7bd32a7ba0#file-post-sh The first part is the header containing some metadata – you can use any base64-decoding tool to see something akin to this: https://gist.github.com/kmikulski/2dd41e4dc2742253946a9f183664c64c#file-post-json The typ field is pretty self-describing, while the alg field denotes the type of algorithm used for signing the token. The value you see above specifically represents RSASSA-PKCS1-v1_5 using SHA-256. But there are also other possibilities, which are specified and described in the appropriate RFC. The last field, kid, stands for key ID – and since there may be multiple keys in use by the server, this is what we’ll be using later to identify the correct one. After the header comes the second part, which is the actual payload containing the client and user data: https://gist.github.com/kmikulski/e9dae415e401e4681d263cfac6e1bf28#file-post-json The fields contained here are referred to by the JWT specification as claims;These represent statements about the given entity. You can look up the meanings of the predefined ones in the IANA JWT Registry. The last field is the signature which ensures that the other two parts are not tampered with. We’ll be using this later to provide actual verification of the token.
Verifying the token
Now we know how the tokens are constructed, we can try to break them down and verify them. Let’s create a skeleton of the trait that’s going to take care of this (note: I’ll be putting the entire logic into a single file to avoid unnecessary confusion. But in a real-life project, you’ll probably want to preserve the separation of concerns by extracting some of this code to different traits/classes): https://gist.github.com/kmikulski/9f6b92c494aeb9b41186c77d2ac235af#file-post-scala The first step here will be the authorize directive, which we’ll be using later to secure the appropriate route. We’ll start by calling the extractCredentials directive, which attempts to retrieve a token from the request’s Authorization header. If one is found, we’ll try to verify it and convert it to an instance of Keycloak’s AccessToken, which will be the value extracted by the directive. If verification fails or a token is missing, we’ll reject the current route. We’ve seen before that our token has been signed with the RSA algorithm. As you’re probably aware, RSA is an asymmetric system, so in order to verify the signature we’ll need a public key. Where do we get it from? That’s easy – from Keycloak itself. First, we’ll need to let our service know how to connect to the Keycloak server. We use the same keycloak.json file that we used last time for our front-end app. If you recall, it should look something like this: https://gist.github.com/kmikulski/6dd09266200099c861de1c107840eb85#file-post-json Save this file into the src/main/resources directory, and initialize the configuration in AuthorizationHandler with the following: https://gist.github.com/kmikulski/6f087ae71b88648803c3923e3ae3e11d#file-post-scala KeycloakDeployment class has a method called getJwksUrl, which returns the URL for the endpoint that serves a collection of public keys. In our case the URL will probably be https://localhost:8080/auth/realms/MyDemo/protocol/openid-connect/certs, and opening it in your browser will yield something like this: https://gist.github.com/kmikulski/da6d4a849cc02c46db9a20ff90696a67#file-post-json Armed with this information, we can retrieve a map of public keys like this: https://gist.github.com/kmikulski/7341346fcc1ff5aff6810fa95994cf9e#file-post-scala Please note that we’re keeping the keys as a val here, since it’s our intention to avoid having to call Keycloak on every token verification. However, depending on the exact nature of the system you’re creating, it’s conceivable that you will have to take into account the possibility of the keys changing while your service is running; hence, you may want to implement some sort of periodic update scheme here. We’re almost there – the last thing remaining is to implement the previously missing verifyToken function: https://gist.github.com/kmikulski/58419a21d5b5eea68cd481fc55dee79c#file-post-scala Firstly, we’ll create an instance of the RSATokenVerifier, which is a helper class provided by Keycloak that will do the grunt work of parsing the token and performing the actual verification. We’ll then attempt to look up the public key based on the ID from the token header. If we manage to find one, we’ll pass it on to the verifier and call the verify method. One thing worth noting is that the return type of this method is also RSATokenVerifier, which enables the use of chaining.
- A verification failure is signalled by throwing a
VerificationException, which enables the use of chaining. - A verification failure is signalled by throwing a
authorizedirective by usingonCompleteinstead ofonSuccess.
The authorizing directive is ready – we can now place it in our UserRoutesdefinition like this: https://gist.github.com/kmikulski/495f0b944f2e5f3b0c409b74668b9ff7#file-post-scala
Testing the results
Now that we’ve completed our implementation, let’s see if it actually works! Restart the back-end service and go to the root page of the front-end app. Firstly, try sending the request from the unsecured component – if you recall, we’re not attaching the authorization header in this instance. 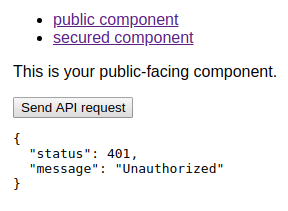 So far so good, just what we’d expect. Now go to the secured component (logging in again if necessary) and try resending the request. Voilà, works just as it did before! But can we be sure that simply adding a random authorization header isn’t enough to gain access to the service? Let’s try to check that now. We’ll be using cURL for this. Open the Network tab of your browser’s Developer Tools and locate the request to the
 users endpoint (you’ll probably see two of them – the first one is the preflight OPTIONS request for CORS, we’re interested in the second one) – if you’re not using some ancient browser, you should have an option to copy the request as cURL. Here’s the result I got, together with the response: https://gist.github.com/kmikulski/00b8dc5ec7d06bfb1ca756b145e9d996#file-post-sh Now try deleting or replacing any part of the token from the request – you should be denied access again: https://gist.github.com/kmikulski/b06068c76d832aacc27f6e6997807af0#file-post-sh
Where to go from here
You’ve now seen how to provide a single sign-on scheme with Keycloak for both a front-end webapp and a back-end service, and you have learned a bit about how OAuth2 and OpenID protocols work in practice. Keep in mind that this is just the tip of the iceberg, and there’s a lot more you will need to learn before you decide to employ this solution in a commercial application. Here are some good sources for further study:
- OAuth2 website, maintained by @aaronpk
- OpenID Connect specification
Do you like this post? Follow us on Twitter or leave a comment below!
More on Akka
- Storing files on Amazon S3 with Alpakka AWS S3 connector
- Improving Akka dispatchers
- Custom GraphStage in Akka Streams
- Introduction to Streams in Akka
- Handling Split Brain scenarios with Akka
See also

Authors
I am an enthusiastic software developer with versatile experience dating back to 2007 and encompassing skills from backend, frontend and mobile; currently fascinated by functional programming and focused on making strides in the world of Scala. In spare time: social dancer, sailor and avid mountain hiker.
Popular Posts in category
Looking into Scala.js

Your first microservices using Scala and Lagom
Handling Split Brain scenarios with Akka